There are probably tens of thousands of web pages related to configuring and optimizing iptables. See the links section for some good ones. Or Google your way there. I know I am not breaking new ground here. However, if you've never set up an iptables configuration before you might be able to glean a bit of information from this page. I believe this configuration is as good as any I've seen posted on the Internet.
Lets be clear on a few things first.
What we are talking about here is configuring a Linux box to protect itself when connected directly to the Internet or a high-risk network. Not a firewall box with other computers behind it. No masquerading or DNAT or any of that stuff. There are some packages out there for that.
Generally, I believe in having a separate, dedicated, hardware firewall in front of all machines connected to the Internet. This can be as simple as one of the commercially available router/firewall units that you can get at the consumer electronics store. They sell for about $40 on up. Or you could build one using PC hardware and any of the readily available linux packages to do this. Obviously the latter choice opens things up considerably in terms of control and flexibility.
Some times you can't avoid connecting servers directly to the Internet, or you don't want to. What we are going to do here should keep you safe against the things you can prevent. This won't do much for denial of service attacks and the like. It will protect your Linux machine and, at the same time, give you some insight into what the black hats might be doing on the other side of the "door".
Redhat distributions used to come with Lokkit, which was a firewall configuration application that was run from the Gnome/KDE desktop. It is better than a jab in the eye with a sharp stick, but just a little bit. You can do much better.
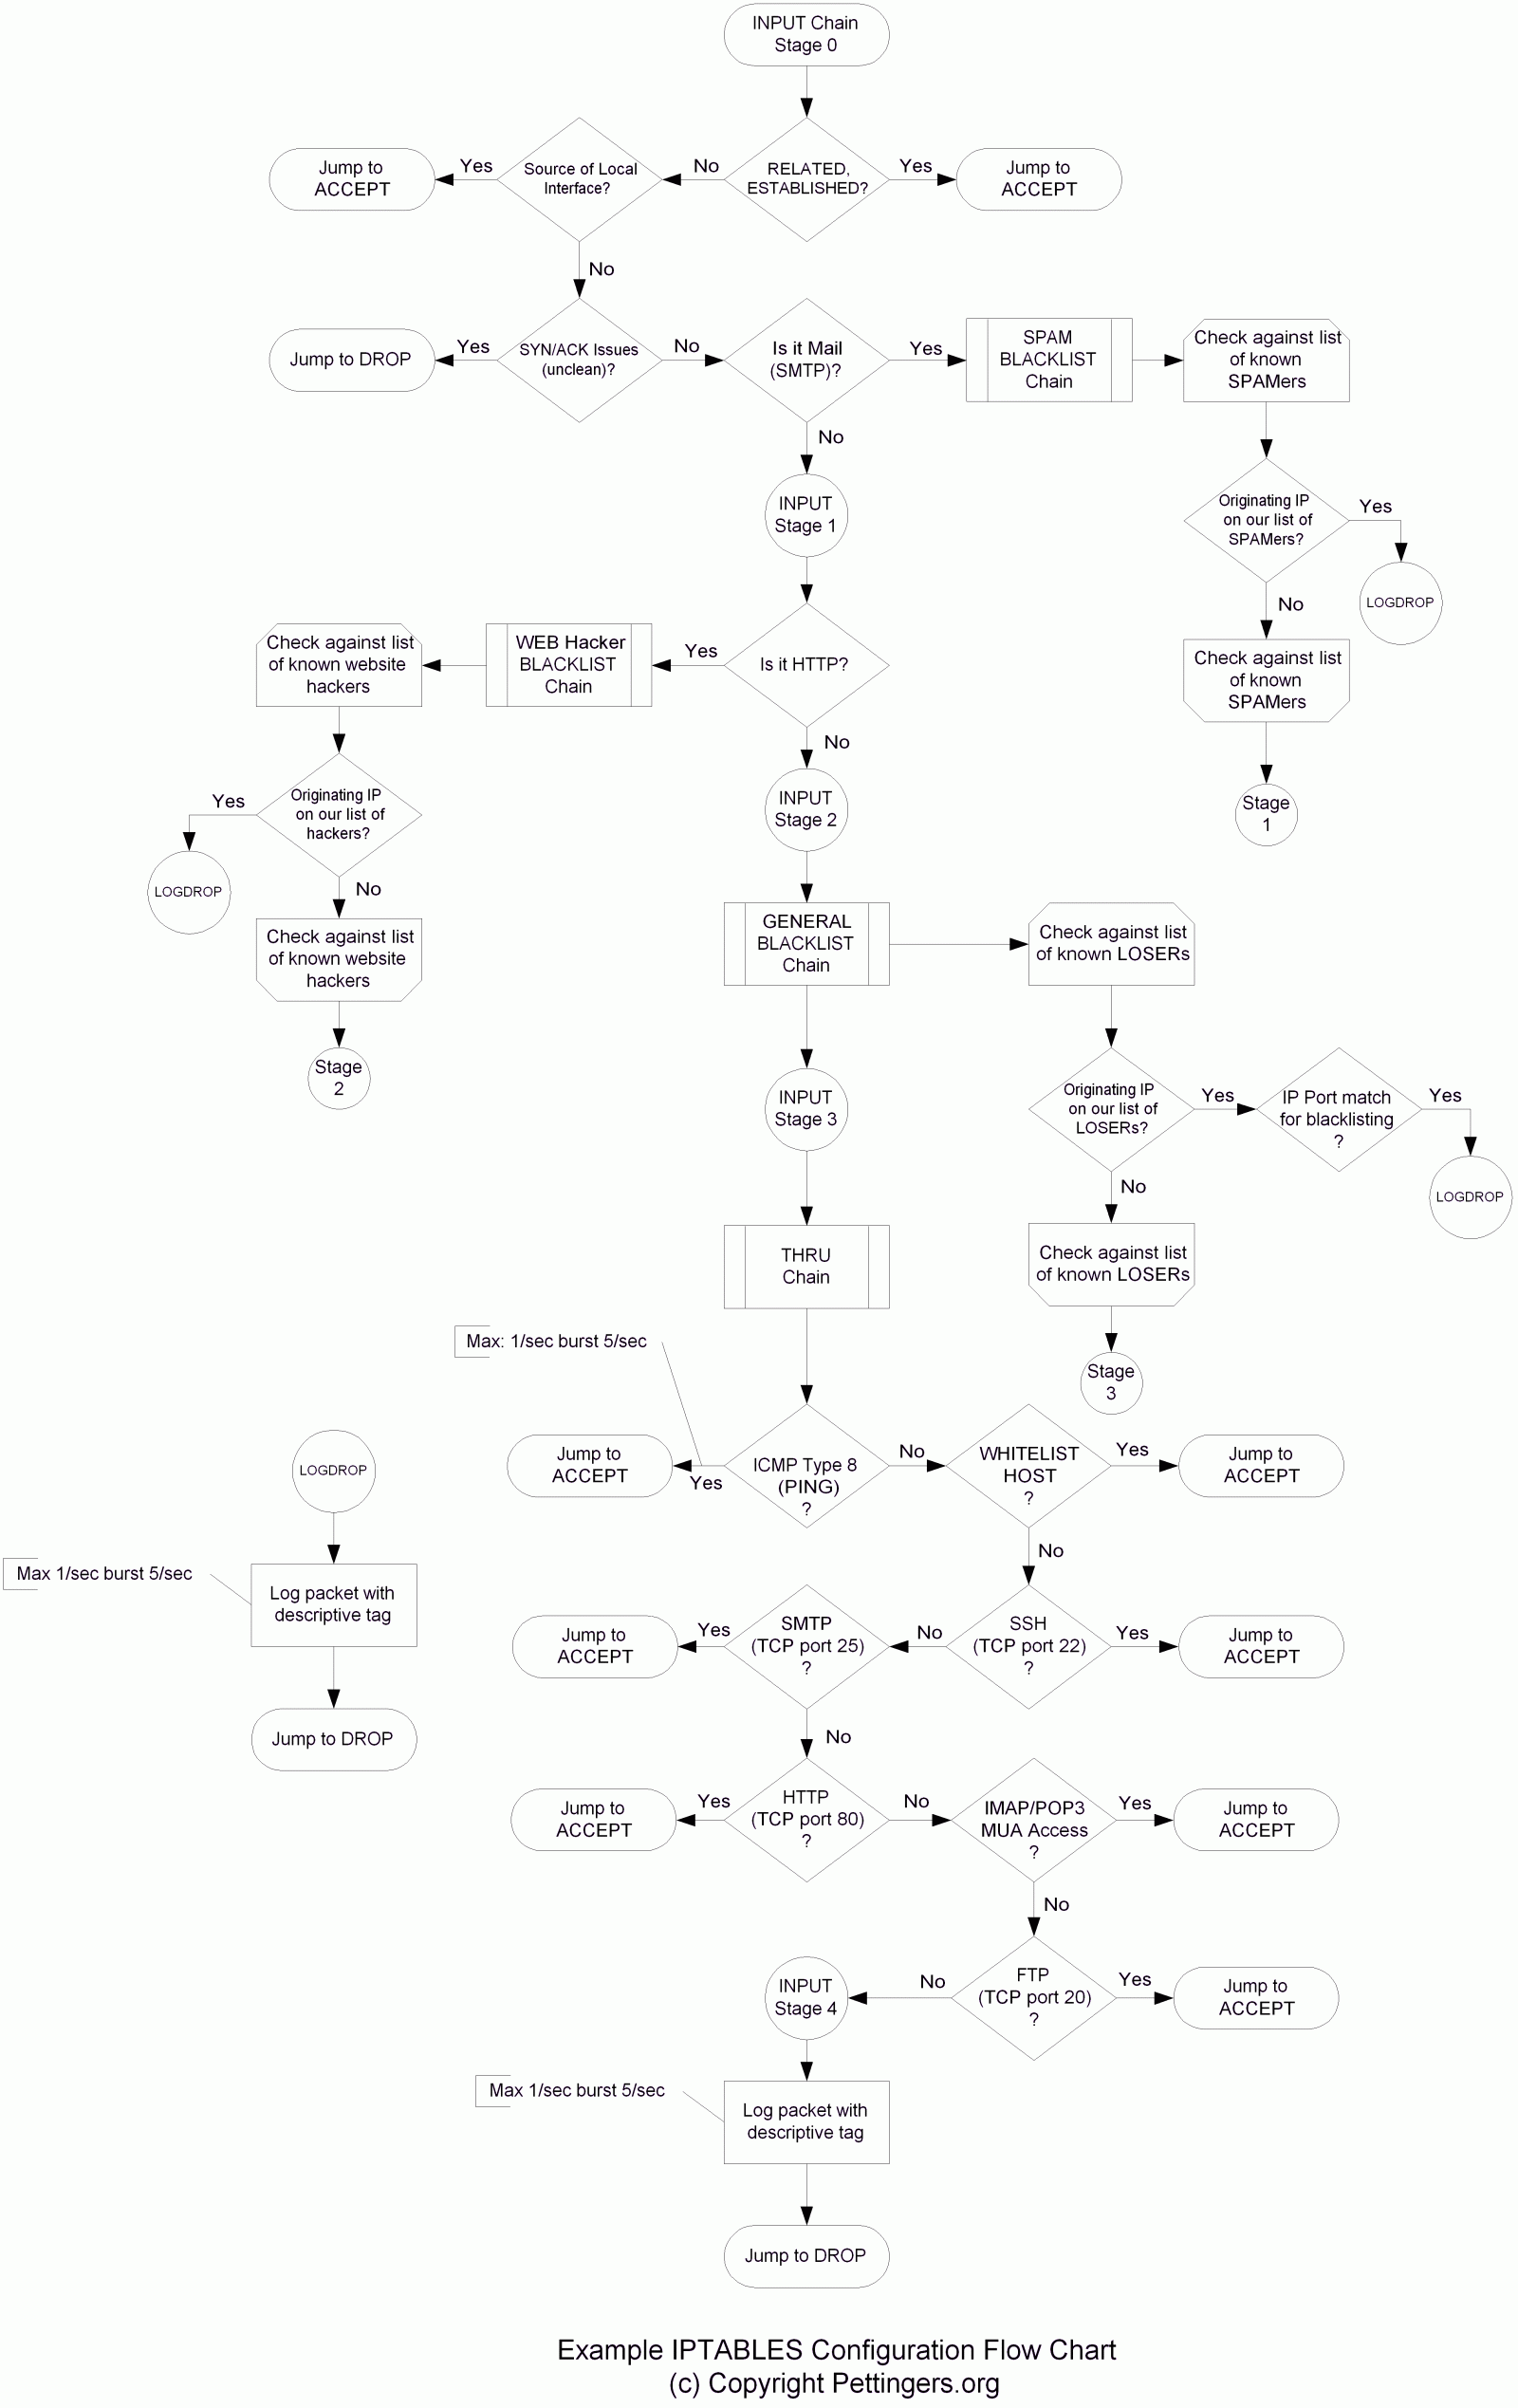
Below is a flow chart of what we are planning to do. Remember flow charts from your FORTRAN class? Venn Diagrams, anyone?
The important thing to remember as we go forward is that ORDER MATTERS! Rules are executed from top to bottom.
One of the annoying things about logging the output of your firewall is that it clutters up the syslog file (commonly /var/log/messages). So lets reroute the firewall logs to another file. There are two things required to accomplish this.
First, we need to tell iptables to log its output with a special flag on it. This way, the syslog daemon can see this flag and route these messages differently than other syslog messages. We do this with the --log-level 7 option on our logging chains. This makes these log entries into "debug" items. More on this later.
Secondly, we need to tell syslog to do something special with these debug log entries. We will have it route them to the file /var/log/iptables although you can chose anything you like for the filename.
So now lets modify our /etc/syslog.conf as follows:
#log firewall drops to /var/log/iptables

kern.=debug             /var/log/iptables
Now we need to restart the syslog daemon with /sbin/service syslog restart and we are ready to move on.
Again, this page (presently) is not here to teach you everything there is to know about iptables. However some simple basics might help if you are truly starting out from scratch with little or no knowledge of iptables. I would also recommend you Google your way around to find some HOWTOs and tutorials on ipatbles. There are lots of good tutorials out there. They will also help you understand how the packets pass through the pre-placed chains (more flow charts!).
A good one can be found at faqs.org.
You will need superuser (root) access to implement this firewall. If you don't have root access or don't even know why we are talking about part of a houseplant, you can probably stop here. Ask your system administrator but expect a big "NO!" Once you are logged in as root, these commands should be available. Note: The actual command is at /sbin/iptables but you should be able to just type iptables assuming /sbin is in your path.
iptables -L -n -v
iptables -D INPUT 3
iptables -I OUTPUT 5 -j SPAM
iptables -A INPUT -j SPAM
Lots of other useful commands exist including replace, rename, etc. Please, suffer through the manual page (man iptables) it is vital reading.
The filter table (implicit -t filter for all the commands listed above) contains three pre-placed chains: INPUT, OUTPUT and FORWARD. INPUT is the most important one to us because it applies to packets coming into the machine. That, obviously, is where we want to stop undesirable packets.
Let's take a look at what we have currently, if your system looks anything other than like the results below, we probably need to do some cleanup. A virgin iptables configuration should look very similar to the results below.
[root@stinky root]# iptables -L -n -v
Chain INPUT (policy ACCEPT 0 packets, 0 bytes)
 pkts bytes target     prot opt in     out     source               destination

Chain FORWARD (policy ACCEPT 0 packets, 0 bytes)
 pkts bytes target     prot opt in     out     source               destination

Chain OUTPUT (policy ACCEPT 0 packets, 0 bytes)
 pkts bytes target     prot opt in     out     source               destination

[root@stinky root]#
Before we clean out the existing chains, we need to make sure we don't shoot ourselves in the foot by blocking all packets from all sources. This would be bad. So lets open up the INPUT chain. Relax, it will be this way for just a minute....
iptables -P INPUT ACCEPT
This will allow packets to be accepted by the host unless they are dropped or rejected by rules and chains within or beyond INPUT (if any exist). So now lets clean out or flush the chains.
	iptables -F INPUT
	iptables -F OUTPUT
	iptables -F FORWARD
If you have any other chains, beyond INPUT, OUTPUT and FORWARD, you'll want to flush and delete (using the -X command) those chains.
Now lets start adding chains and the referring rules which will allow us to implement that big, ugly flowchart above.
We are going to create five custom chains. We will use these as targets for our rules as we go on. The order of these within the iptables framework will be important. Below, however, I list them in no particular order.
So lets create these chains.
iptables -N SPAM
iptables -N WEB
iptables -N BLACKLIST
iptables -N THRU
iptables -N LOGDROP
Pretty difficult, huh?
Now lets get set up to call these from our INPUT chain. Be careful of the order here, it is vital for nearly all of these entries. Also nearly everything here is case sensitive so ACCEPT is different than accept.
iptables -A INPUT -i eth0 -m state --state RELATED,ESTABLISHED -j ACCEPT
Our first rule! Whoohoo! So what the heck does this do? Well, you'll notice we appended it to the INPUT chain. As this was the first rule we entered, it got added as rule number one. The -i eth0 tells it to look at packets coming in on Ethernet port 0 which is commonly the first (and commonly the only) ethernet port on the machine. The -m state tells it to match on the state which we've defined as RELATED,ESTABLISHED. This means only sockets that already exist or sockets that are related to existing connections. This is pretty powerful in that once we have an approved, accepted connection up, we go no further than this rule. What this means is that you do not have to check every packet from every host all the time. You literally shortcut every rule after the initial checking. See the comments on this below. Lastly, you'll see the -j ACCEPT. This is a jump to the built-in ACCEPT target which means the packet is allowed to pass on through the iptables framework.
Our second rule is even easier.
The rule above allows all packets from the localhost interface, lo. This is so the machine can talk to itself, which it does a lot.
Now for some optional ones. The rules below look for malformed packets and things that no self respecting IP device should be expected to handle. Basically they just check for oddballs that you don't need to be processing.
iptables -A INPUT -i eth0 -p tcp -m tcp --tcp-flags FIN,SYN,RST,PSH,ACK,URG NONE -j DROP
iptables -A INPUT -i eth0 -p tcp -m tcp --tcp-flags FIN,SYN FIN,SYN -j DROP
iptables -A INPUT -i eth0 -p tcp -m tcp --tcp-flags SYN,RST SYN,RST -j DROP
iptables -A INPUT -i eth0 -p tcp -m tcp --tcp-flags FIN,RST FIN,RST -j DROP
iptables -A INPUT -i eth0 -p tcp -m tcp --tcp-flags FIN,ACK FIN -j DROP
iptables -A INPUT -i eth0 -p tcp -m tcp --tcp-flags ACK,URG URG -j DROP
These can all be replaced with the optional (and still listed as experimental):
iptables -A INPUT -i eth0 -m unclean -j DROP
Now we run things through our first custom rule, our SPAM blacklist. The rule below (obviously added to the INPUT chain) is going to send any packet on TCP port 25 to the SPAM chain. Pretty simple.
iptables -A INPUT -i eth0 -p tcp -m tcp --dport 25 -j SPAM
Lets do the same for our HTTP (WEB) blacklist:
iptables -A INPUT -i eth0 -p tcp -m tcp --dport 80 --tcp-flags SYN,RST,ACK SYN -j WEB
The extra --tcp-flags above are optional and just an example. This basically looks for new connections. The --dport 80 is the important piece as this looks for HTTP connection attempts.
Now that we know what we are doing, lets add the rest of the rules for the INPUT chain.
iptables -A INPUT -j BLACKLIST
iptables -A INPUT -j THRU
iptables -A INPUT -m limit --limit 1/sec -j LOG --log-prefix "drop_packet" --log-level 7
You can see we are running it through our last blacklist, the general purpose BLACKLIST chain and then it moves on to the THRU chain which will check for things to explicitly allow. The last line is kind of important -- it will log any packets that fail to get addressed by our other chains. Two things to note here on the last line. First, any line with a jump target of LOG is what's called a non-terminating jump. That is, the packet does not stop there. Almost like a copy of the packet is sent to the LOG routine but the original carries on through the chains (or the next rule). Secondly, you will notice that we added our --log-level 7 modifier so that we can flag these to be sent to our special syslog file. When we are done with the first part of this setup, we will add one more rule to the INPUT chain, a DROP rule that will directly follow the LOG rule and kill anything that didn't make it through the THRU chain. Now let's build up our other chains.
Below is all the items we are going to add to our THRU chain. This is the chain where we explicitly state which ports we allow through. I have some common ones below. Obviously if you are not running a web server you will not need port 80. No mail server? Don't allow port 25.
iptables -A THRU -p icmp -m limit --limit 1/sec -m icmp --icmp-type 8 -j ACCEPT
iptables -A THRU -i eth0 -p tcp -m tcp --dport 22 -j ACCEPT
iptables -A THRU -i eth0 -p tcp -m tcp --dport 25 -j ACCEPT
iptables -A THRU -i eth0 -p tcp -m tcp --dport 80 -j ACCEPT
iptables -A THRU -i eth0 -p tcp -m tcp --dport 21 -j ACCEPT
iptables -A THRU -i eth0 -p tcp -m tcp --dport 110 -j ACCEPT
Everything here should be familiar with the exception of the -m limit. You will notice that this also utilizes the -p icmp which is a protocol specifier for ICMP. Type 8 defines pings. So what we are doing is limiting pings to one per second. Want to limit it to 2 per second or 1 per minute? You can do that.
Lets add our last line now to the INPUT chain and lock things down. Note that this obviates the need to change the policy for the input chain to DROP. Although we should do that to make things a bit more foolproof if we add rules on to the INPUT chain in the future.
iptables -A INPUT -j DROP
iptables -P INPUT DROP
As the configuration stands right now, you are very well protected. You have:
We need to build up our LOGDROP chain. You can add lines to this as you like. The basic idea is that we will add descriptive annotations to the log entries so that we can later parse these with log analysis tools or even simple things like egrep.
iptables -A LOGDROP -p tcp -m tcp --dport 25 -m limit --limit 1/sec -j LOG --log-prefix "spam_blacklist" --log-level 7
iptables -A LOGDROP -p tcp -m tcp --dport 80 -m limit --limit 1/sec -j LOG --log-prefix "web_blacklist" --log-level 7
iptables -A LOGDROP -p tcp -m tcp --dport 22 -m limit --limit 1/sec -j LOG --log-prefix "ssh_blacklist" --log-level 7
iptables -A LOGDROP -j REJECT --reject-with icmp-host-prohibited
All we are doing is checking which port the packet is on once the packet gets cast into the depths of LOGDROP. The last line is the death knell for the packet. We have limited the logging to 1 packet per second. This might be a bit high for some, you can easily do --limit 1/min and likely see everything you need to see.
All we have left to do is to make use of those blacklists we created and add some detail to our logging feature. Truthfully, you can skip all the steps below and your machine will run fine and be well protected. Unfortunately other people can make life hard for you. So we have a place for those people. I'll show manual examples below, but you can use things like SSHBlack, DAVBlack,blockme (a simplified version is here) and mailmgr to automatically add IP addresses to this list.
iptables -I BLACKLIST -s 192.168.254.1 -j LOGDROP
iptables -I BLACKLIST -s 192.168.253.0/24 -p tcp --dport 22 -j LOGDROP
iptables -A SPAM -s scum.spammers.org -j LOGDROP
iptables -A WEB -s script.kiddies.com -j LOGDROP
Some notes about the four examples above:
If you now check your iptables, you should see something kind of like this: [Sorry for the tiny font]
[root@stinky root]# iptables -L -n -v
Chain INPUT (policy DROP 0 packets, 0 bytes)
 pkts bytes target     prot opt in     out     source               destination
 194K   41M ACCEPT     all  --  eth0   *       0.0.0.0/0            0.0.0.0/0      state RELATED,ESTABLISHED
45321   76M ACCEPT     all  --  lo     *       0.0.0.0/0            0.0.0.0/0
    0     0 DROP       tcp  --  eth0   *       0.0.0.0/0            0.0.0.0/0      tcp flags:0x3F/0x00
    0     0 DROP       tcp  --  eth0   *       0.0.0.0/0            0.0.0.0/0      tcp flags:0x03/0x03
    0     0 DROP       tcp  --  eth0   *       0.0.0.0/0            0.0.0.0/0      tcp flags:0x06/0x06
    0     0 DROP       tcp  --  eth0   *       0.0.0.0/0            0.0.0.0/0      tcp flags:0x05/0x05
    0     0 DROP       tcp  --  eth0   *       0.0.0.0/0            0.0.0.0/0      tcp flags:0x11/0x01
    0     0 DROP       tcp  --  eth0   *       0.0.0.0/0            0.0.0.0/0      tcp flags:0x30/0x20
  465 27669 SPAM       tcp  --  *      *       0.0.0.0/0            0.0.0.0/0      tcp dpt:25
 1255 61764 WEB        tcp  --  eth0   *       0.0.0.0/0            0.0.0.0/0      tcp dpt:80 flags:0x16/0x02
 3801  229K BLACKLIST  all  --  *      *       0.0.0.0/0            0.0.0.0/0
 3762  227K THRU       all  --  *      *       0.0.0.0/0            0.0.0.0/0
 1378 96990 LOG        all  --  *      *       0.0.0.0/0            0.0.0.0/0      limit: avg 1/sec burst 5 LOG flags 0 level 7 prefix `drop_packet'
 1551  105K DROP       all  --  *      *       0.0.0.0/0            0.0.0.0/0

Chain FORWARD (policy DROP 0 packets, 0 bytes)
 pkts bytes target     prot opt in     out     source               destination

Chain OUTPUT (policy ACCEPT 249K packets, 115M bytes)
 pkts bytes target     prot opt in     out     source               destination

Chain BLACKLIST (1 references)
 pkts bytes target     prot opt in     out     source               destination
   16   960 LOGDROP    tcp  --  *      *       218.8.127.193        0.0.0.0/0      tcp dpt:22
   18  1080 LOGDROP    tcp  --  *      *       205.209.180.130      0.0.0.0/0      tcp dpt:22
    0     0 LOGDROP    tcp  --  *      *       213.25.122.250       0.0.0.0/0      tcp dpt:22

Chain LOGDROP (538 references)
 pkts bytes target     prot opt in     out     source               destination
   18   864 LOG        tcp  --  *      *       0.0.0.0/0            0.0.0.0/0      tcp dpt:25 limit: avg 1/sec burst 5 LOG flags 0 level 7 prefix `spam_blacklist'
    0     0 LOG        tcp  --  *      *       0.0.0.0/0            0.0.0.0/0      tcp dpt:80 limit: avg 1/sec burst 5 LOG flags 0 level 7 prefix `web_blacklist'
   15   900 LOG        tcp  --  *      *       0.0.0.0/0            0.0.0.0/0      tcp dpt:22 limit: avg 1/sec burst 5 LOG flags 0 level 7 prefix `ssh_blacklist'
   52  2904 REJECT     all  --  *      *       0.0.0.0/0            0.0.0.0/0      reject-with icmp-host-prohibited

Chain SPAM (1 references)
 pkts bytes target     prot opt in     out     source               destination
    0     0 LOGDROP    all  --  *      *       222.249.0.0/17       0.0.0.0/0
    0     0 LOGDROP    all  --  *      *       222.248.0.0/16       0.0.0.0/0
    0     0 LOGDROP    all  --  *      *       222.240.0.0/13       0.0.0.0/0
    0     0 LOGDROP    all  --  *      *       222.232.0.0/13       0.0.0.0/0
    0     0 LOGDROP    all  --  *      *       59.0.0.0/11          0.0.0.0/0

Chain THRU (1 references)
 pkts bytes target     prot opt in     out     source               destination
   15   621 ACCEPT     icmp --  *      *       0.0.0.0/0            0.0.0.0/0      limit: avg 1/sec burst 5 icmp type 8
   42  2088 ACCEPT     tcp  --  eth0   *       0.0.0.0/0            0.0.0.0/0      tcp dpt:22
  438 25776 ACCEPT     tcp  --  eth0   *       0.0.0.0/0            0.0.0.0/0      tcp dpt:25
 1255 61764 ACCEPT     tcp  --  eth0   *       0.0.0.0/0            0.0.0.0/0      tcp dpt:80
   10   492 ACCEPT     tcp  --  eth0   *       0.0.0.0/0            0.0.0.0/0      tcp dpt:21
  269 16164 ACCEPT     tcp  --  eth0   *       0.0.0.0/0            0.0.0.0/0      tcp dpt:110

Chain WEB (1 references)
 pkts bytes target     prot opt in     out     source               destination
    0     0 LOGDROP    all  --  *      *       212.135.188.179      0.0.0.0/0
    0     0 LOGDROP    all  --  *      *       203.31.169.16        0.0.0.0/0
    0     0 LOGDROP    all  --  *      *       213.253.126.91       0.0.0.0/0
    0     0 LOGDROP    all  --  *      *       202.38.216.127       0.0.0.0/0
[root@stinky root]#
Remember we said how great it was that we could check if connections were already established? That way we wouldn't have to traverse all the rules and chains for all those packets from sources that already passed our test. In general this works very well. However, there may be conditions where this can cause problems. The reason: your computer has to keep track of these connections some how. If you are under extremely high-load conditions, this table of connections may become full. When this happens, the process that attempts to keep track of all these connections (named ipconntrack) will drop these connections. Nothing will crash, you just may see unexpected connection failures for things like downloads. Unless you are running a monstrous website or are into file-sharing schemes, this probably isn't worth worrying about.
If you find messages like: ip_conntrack: maximum limit of XXXX entries exceeded in your logs then you may need to expand the buffer size of this ipconntrack buffer. You can find the current value in /proc/sys/net/ipv4/ip_conntrack_max. You can change it by doing something like:
echo "16384" > /proc/sys/net/ipv4/ip_conntrack_max
Of course you can use whatever number you like, but remember that each connection requires about 340 bytes of memory.
iptables provides a nice mechanism for saving and reloading all your work. This is done with the iptables-save and iptables-restore commands. Catchy names, huh?
Oddly enough both of these commands work from STDIN so you'll need to use redirection to get it to read or write to a file. So for saving the contents you would use iptables-save -c > iptables.bak and for restoring, you would use something like iptables-restore -c < iptables.bak
Use the -c option with these commands to save packet counts. The command iptables-restore -c < iptables.bak (you can name the file anything you want) would be an excellent command to place in your /etc/rc.d/rc.local file.
If you would like some excellent items to add to your SPAM list, have a look here. Check back often as those are updated regularly. Just do a search-and-replace to change the INPUT string to your SPAM string. You can also change the jump target from DROP to LOGDROP. If you'd like a ready-to-load version in a shell script, you can use this but realize it may be a bit out of date by the time you've read this. It is configured to load into the framework above (again, do a search-and-replace if you need to change the chain names) and includes a full blacklist of China, Taiwan and Korea. The Taiwan chains were from the perpetually off line blackholes.us list.
pettingers.org